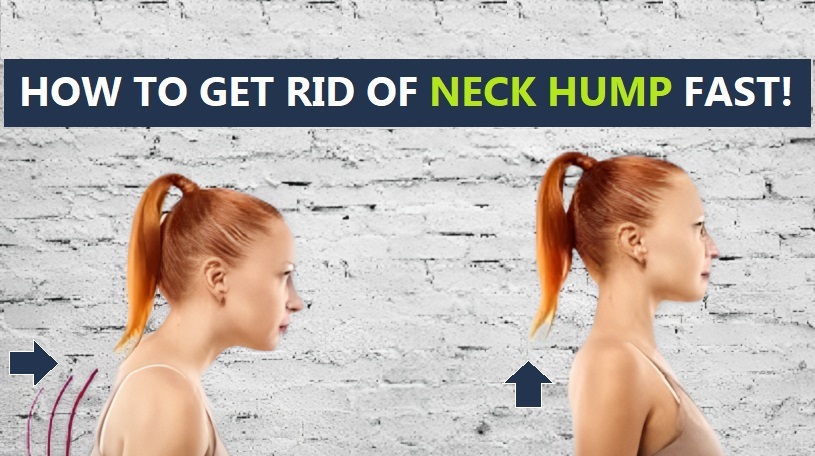
How To Get Rid Of Neck Hump Fast: The 3 Best Exercises
Have you spotted a little extra something on the back of your neck lately? No need to panic – that bump is quite common actually.
We’ve all heard of the classic “dowager’s hump” – so named because it’s something that tends to develop over time as bad posture habits pile up. No judgement here of course, we’ve all been guilty of stressing our poor spines at one point or another.
The good news is, with just a few simple tweaks and targeted exercises, your neck curve can start correcting itself before too long. I know from experience just how much of a relief it is to see that hump shrinking away.
We’ve got some effective exercises for neck humps below, which are very good at correcting the posture. With that said, let’s look into how you can tackle this condition.
Contents
What Causes Neck Humps
So we’ve heard it called dowager’s hump or buffalo hump before – both good descriptors for how it makes our necks take on a more rounded appearance. Btw, the medical term for this condition is cervical lordosis.
Essentially, over time our posture muscles get used to holding us in positions that pull our heads forward and shoulders rounded. Things like hunching over desks, phones, even just carrying around heavy purses can all contribute.
So the main causes of a buffalo hump (neck hump) are…
- Poor posture habits are a primary cause as they shorten muscles at the back of our necks and upper backs.
- Chronic stress also plays a role. High cortisol levels from being frazzled frequently signal our bodies to bulk up the trapezius muscles as a defense response – further emphasizing the rounded look.
Now while posture flaws alone can start the process, stress definitely amplifies it through muscular compensations. The two factors tend to reinforce each other if left unaddressed long term.
It’s also worth noting some rare medical conditions like Cushing’s syndrome can cause excess cortisol production and lead to hump development more severely. But for most of us, daily posture issues are the real culprit we can improve through conscious effort.
The good news is with awareness and targeted exercise, we have the power to reverse these impacts and return our necklines gracefully back to baseline over time.
How to Sleep to Fix Your Neck Hump

When it comes to optimizing sleep posture, paying attention to your pillow placement is key for neck hump reversal. Here are some tips:
- Avoid sleeping on your stomach if you have a hump. This arches your neck at an extreme angle all night.
- Back sleeping is better, but use only a thin pillow or fold your regular one in half. You want just enough support to keep your neck straight.
- Side sleeping is great as long as your shoulders aren’t rolled forward. Opt for a low, narrow pillow that doesn’t tilt your head down at all.
- You can also try sleeping without a pillow for a flatter surface. Use your judgment based on your comfort levels.
The goal is to prevent further flexion of your neck all through the night. Your natural spine curve should continue right down through your shoulders when lying horizontal.
If you tend to toss and turn, mindfully adjust yourself back into good form when waking to change positions. Self-massage your upper back muscles before bed too for better support.
It takes vigilance at first, but soon your muscles will re-learn the proper alignment subconsciously. Within a few weeks your hump should see improvement just from sleep alone.
How to Get Rid of Neck Hump Fast with These Exercises
If you’re eager to flatten your neck curve in a hurry, focus your routine on these super-effective exercises:
Chin Tucks
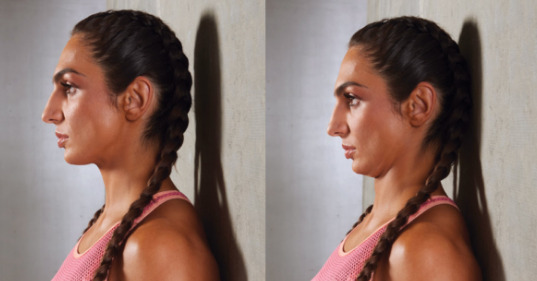
Chin tucking is an important exercise that targets the back of the neck muscles (suboccipitals). It helps correct forward head posture and reduces neck tension.
Steps for the chin tuck exercise
- Start by standing or sitting tall with your shoulders back and down.
- Place one finger on your chin and one on the back of your head.
- Gently tuck your chin inward toward your chest so your ears shift slightly back and over your shoulders.
- You should feel a stretch in the back of your neck but not pain. Hold for 5 seconds.
- Return your head to the neutral starting position and repeat.
- Do 10-15 repetitions, holding for 5 seconds each time.
- For extra challenge, do chin tucks against a wall with your head and upper back in contact.
- You can also pair chin tucks with other exercises like shoulder rolls for better posture training.
Be sure not to crank your neck too far or bounce. Go slowly and focus on good form for safety.
Foam Roller Release
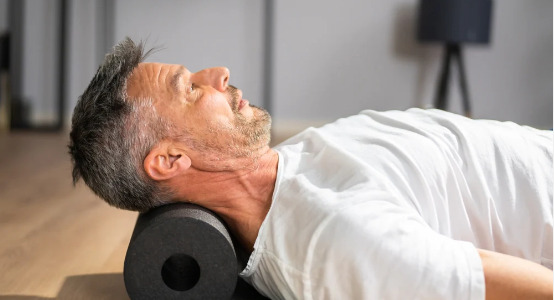
Roll the upper back daily for 5 minutes, paying extra time to knotted areas – this is a technique called Myofascial release. This is a soft tissue manipulation method.
Here are the basic steps to perform foam roller exercise
- Lie on your back on the floor with a foam roller positioned vertically at the base of your neck/top of upper back.
- Position your arms out to your sides for support and balance your body weight evenly.
- Slowly roll your neck and upper back up and down the length of the roller in a controlled motion.
- Apply gentle-to-moderate pressure on tight or knotted muscle areas, allowing the roller to knead into the tissue.
- Inhale as you roll up the muscles, exhale as you roll back down.
- Roll back and forth over the trapezius muscles on each side of your neck/shoulders.
- Roll in smaller motions on any especially tender spots that arise.
- Roll for 1-2 minutes per side, taking breaks as needed.
- Repeat the routine 2-3 times per week for 6-8 weeks to see results.
- Stretch and foam roll daily to reinforce good posture and continue releasing muscle tension.
The key is applying steady, deep pressure to lengthen tight upper back muscles over time through this myofascial release technique.
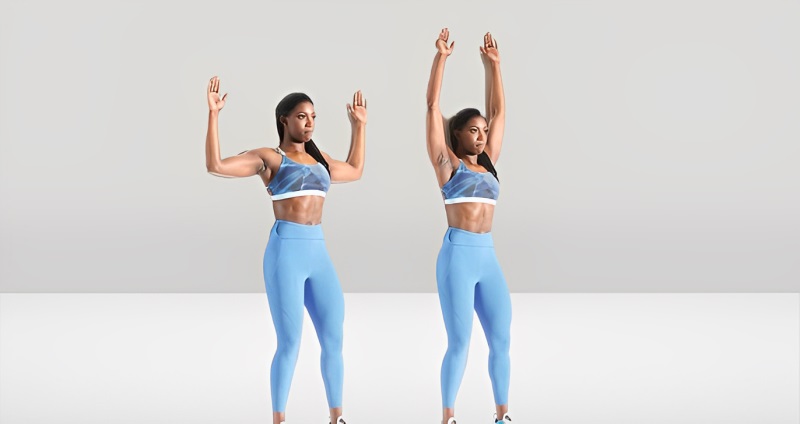
Wall Angels
Here are step-by-step instructions for doing wall angels:
- Stand with your back facing a wall, about 1-2 feet away from it. Your heels, butt, shoulders, and head should all be in contact with the wall.
- Raise your arms out from your sides so they are parallel to the floor, with your palms facing down. This is the starting position.
- Keeping your heels, butt, and head in contact with the wall, slowly raise your arms up toward the ceiling until they are directly above your shoulders. Your arms should form a “Y” shape.
- Continue to raise your arms up as high as you comfortably can while maintaining contact with the wall with your lower body. Hold for 1-2 seconds.
- Slowly lower your arms back down to the starting position by your sides, maintaining contact with the wall.
- Repeat the movement of raising your arms up and lowering back down for 10-15 repetitions.
- For more challenge, you can raise only one arm at a time while keeping the other anchored by your side. Alternate sides.
- Be sure to keep your back flat against the wall throughout the movement and don’t hunch your shoulders up by your ears.
That’s it! Wall angels target your upper back and shoulder mobility.
You can also take a look at the video below for some powerful neck hump-reducing exercises
How Long It Takes to Lose a Neck Hump?
The timeline for reducing a neck hump depends on factors like exercise consistency and lifestyle habits, as well as our ability to lower chronic stress levels over time.
High cortisol from stress contributes to neck humps by triggering compensatory muscle growth. Decreasing cortisol through relaxation techniques and eliminating stressors can directly impact the rate of improvement.
Here are some revised timelines that factor in cortisol reduction:
- 4-8 weeks: Daily exercises along with relaxing tecniques such as deep breathing, etc. can start lowering cortisol and smoothening 30-40% of the neck curve.
- 2-6 months: Consistency with posture rehab plus lifestyle tweaks like relaxing massages, quality sleep, social support will likely shrink the hump 40-60%.
- 6-15 months: For a fully corrected neckline, plan for it to take up to a year with continued mindfulness practices and healthy stress coping strategies helping cortisol decline close to normal levels.
The key is making neck exercises just one part of an overall self-care routine focused on reducing chronic stress physiology over the long haul. A multifaceted approach will give the body the best chance to fully revert muscle changes caused by high cortisol exposure over time.
SANTINY Women's 3"/4"/5" Athletic Running Shorts Zipper Pocket Gym Shorts | Workout Shorts, Dolphin, High Waisted, Quick Dry, Lightweight, Breathable, Shorts for Women
$14.99 (as of 24 July 2026 04:29 GMT +01:00 - More infoProduct prices and availability are accurate as of the date/time indicated and are subject to change. Any price and availability information displayed on [relevant Amazon Site(s), as applicable] at the time of purchase will apply to the purchase of this product.)
Flow Pouches Mushroom Nootropic Pouches, 600mg Lion's Mane Reishi Cordyceps Energy Pouches for Focus and Clean Energy, Caffeine Free Sugar Free Nicotine Free, Now Made in USA (5 Cans, Cool Mint)
$49.00 (as of 24 July 2026 04:29 GMT +01:00 - More infoProduct prices and availability are accurate as of the date/time indicated and are subject to change. Any price and availability information displayed on [relevant Amazon Site(s), as applicable] at the time of purchase will apply to the purchase of this product.)