
DIY Probiotic Water (Just 2 Ingredients!)- A How-To Guide
I’m pumped to show you how to easily whip up your own DIY probiotic water right in your kitchen. This simple recipe takes just a few minutes and basic ingredients you likely already have at home.
Brewing your own probiotic water is super cost-effective compared to buying fancy bottled brands. And the whole family can enjoy it – kids and adults alike!
The benefits of probiotics are endless – improved digestion, immunity, skin health, you name it. But store-bought drinks can get pricey. With this DIY approach, you can enjoy home-fermented probiotic water every day on the cheap!
I love that making your own allows you to control exactly what goes in it too. You can choose raw, local honey for its health properties. And adapt the ferment time to make it as strong as you like.
Home fermentation sounds intimidating but I promise this recipe is fool-proof. All it takes is a jar, some honey, probiotics and a little patience. No fancy equipment is required.
Even if you’ve never fermented anything before, you can totally nail this on your first try. I’ll walk you through each simple step.
Contents
You’re Going to Need:
- A sanitized mason glass jar filled with purified water (avoid tap water with chlorine)
- Raw honey (I like buckwheat honey for its deep, rich color and unique flavor)
- Probiotic capsules
Why This Probiotic Water Works
When making probiotic water, the honey and probiotics each serve an important purpose:
The honey is there to feed the probiotic bacteria and fuel the fermentation. Just like us, probiotics need food to thrive. The natural sugars in raw honey make it the perfect probiotic snack.
As the probiotics munch on the honey, they start to rapidly multiply and populate the water. This growth is what creates the bubbles, foam, and other signs of fermentation.

Meanwhile, the probiotic bacteria also produce beneficial compounds like acids, vitamins, and enzymes that infuse the water with gut-healthy properties.
That’s why strained probiotic water becomes filled with more than just live bacteria – it becomes a nutrient-packed tonic.
The probiotics we add are what start this whole transformative process. Without probiotic bacteria, the honey water would simply sit there and nothing would happen.
But once we add the probiotic powder, the live cultures kickstart fermentation. They act as little microscopic workers that ferment the honey and turn our jar of water into a functional probiotic drink.
It’s amazing how a few simple ingredients – water, honey, and probiotics – can transform into a health-promoting elixir through the power of fermentation!
How To Make Probiotic Water Step By Step

Here’s the easy step-by-step way to create this amazing probiotic water.
1. Adding the Honey
Add 1⁄2 to 1 teaspoon of honey to the jar of water. The honey will act as food for the probiotics during the fermentation process.
2. Adding the Probiotic Capsules
Next, open up a probiotic capsule. Try to choose a high-quality one, this will reflect in the end product. We recommend Primal Harvest but you can use any good quality probiotic of your choice. Sprinkle about half of the powder into the honey water. Put the lid on the jar tightly and give it a good shake to mix it up.
The Fermentation Process
Alright, fermentation time. Pop your jar onto a windowsill out of direct sunlight and let it do its thing for 2-3 days.
I’ve never had issues leaving it on the sill, even with light exposure. The fermentation magic happens regardless.
Over the next few days, you’ll see bubbles start to rise up and foamy stuff will form at the top. This is totally normal – it means healthy probiotic activity. But it won’t get fizzy or carbonated like kombucha.
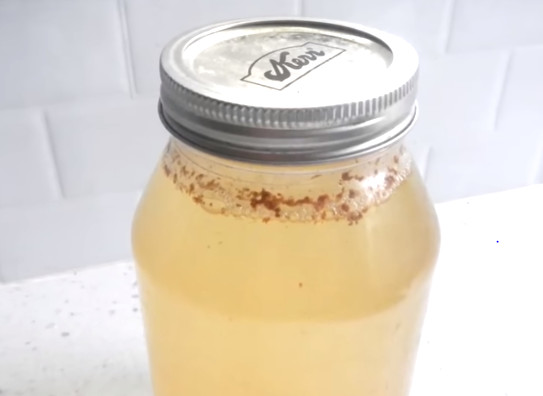
Around day 4, you might notice some odd floaty bits and brown stuff. I know, it looks funky! But this is just waste from the hardworking probiotics. It’s a good sign they’re reproducing and fermenting like crazy.
While it may look gross, it means your probiotics are active and chowing down on that honey food. Still, you probably don’t want to drink the floaties – so just strain them out.
When you’re ready to enjoy your probiotic water, grab a new clean jar and pour it through a mesh strainer. This catches all the brown floaty bits, leaving just the good stuff!
Pop on the lid, and your homemade probiotic water is ready to go.
Making The Starter
Alright, once you’ve enjoyed a healthy and gut benefiting probiotic water, it’s time to make some more. Let’s look at how to make a “starter” for your next batch.
- Towards the end of your current jar, save about 1⁄4 of it to use as a starter. Then top off the jar with fresh purified water.
- Add another 1⁄2 to 1 tsp of honey – this gives those probiotics fuel to keep on fermenting and reproducing.
- Pop the lid on tight and shake it up to mix (unlike me, try not to spill everywhere!).
- Now simply return the starter jar to the windowsill for another 2-3 days of fermentation.
Those active probiotic cultures will get right back to work fermenting the honey water. This starter liquid gives your next batch a boost by populating it with thriving probiotic bacteria.
Troubleshooting Tips
No Foam or Floaties
Don’t freak out if your probiotic water doesn’t foam up or develop brown floaties during fermentation. This alone doesn’t mean it failed. Instead, open the jar and take a sniff. Does it have a light, sweet, tangy fermented scent? If yes, then fermentation likely happened successfully!
I’ve had many batches that didn’t foam or float but smelled deliciously fermented. Visible bubbling isn’t required.
However, if it smells exactly like plain water, fermentation probably didn’t take place. Try adding more probiotics and honey, and ferment somewhere warmer. My house stays around 70°F year-round which is ideal. If your home is cooler, the warmer temperature will help kickstart fermentation.
Be patient and give it another 2-3 days before tossing the batch. With some troubleshooting, you can still rescue lagging fermentation.
Extended Fermentation Time
What if you end up letting your probiotic water ferment for longer than the recommended 2-3 days? Not to worry! Leaving it for 5, 7, 10 days, or even longer is totally fine. Here’s the thing – extended fermentation time simply allows the probiotics to become more active and populate more densely. This results in a brew that’s extra strong in probiotics!
The downside is that the taste and smell will become much more intense and tangy. But I promise, there’s no harm in letting it go extra long. I’ve left batches sitting for a week or more just because life got busy. Even 2 weeks is OK. The probiotic water just gets ultra funky, sour, and fizzy – but it’s still safe to drink.
The probiotics actually reach their peak activity around 7-10 days in. After that, they start to die off, and the benefits plateau.
So feel free to let it ride longer than 3 days if you want maximum probiotic power. Just be prepared for a strong sour kick. Some folks dilute it before drinking if it gets too intense.
When To Throw Out A Batch Of Probiotic Water
I want your probiotic water to be safe, so let’s talk about when to throw out a batch.
If you notice any mold, fuzz, or odd colors like black, green, or pink – toss it. The same goes for a truly rancid, rotten smell. The fermentation smell should be sweet and tangy, not foul.
I know it’s hard to waste a batch, but don’t drink any probiotic water with weird textures/colors/smells. Safety first!
Even saving the starter liquid is risky if the batch goes bad. Best to thoroughly sanitize your jar and start a fresh new batch from the beginning.
Bottom Line – DIY Probiotic Water
And there you have it folks – everything you need to know to start brewing your own probiotic gut health elixir!
I hope this guide gets you pumped about the possibilities of DIY fermentation. Homemade probiotic water puts store-bought to shame.
Imagine waking up to a refreshing glass of your own custom probiotic water every morning – your gut and immune system will thank you!
It only takes a few minutes of hands-on time and a little planning. The fermentation magic happens on its own.
Give it a try this week and let me know how your first batch turns out! I absolutely love hearing about your adventures in home fermentation.
And remember – have fun with it! Flavor your water with different types of honey, fruits, herbs, you name it. Get the whole family involved.
Here’s to happy guts and better health. Cheers to homemade probiotic water.
Sweet Bee Organic sleep magnesium butter, Original Lavender Nighttime Magnesium Cream for Sleep with Shea & Mango Butter,Apply to Legs or Feet Before Bed, Skin-Friendly, 4.23 oz
$29.99 (as of 24 July 2026 04:29 GMT +01:00 - More infoProduct prices and availability are accurate as of the date/time indicated and are subject to change. Any price and availability information displayed on [relevant Amazon Site(s), as applicable] at the time of purchase will apply to the purchase of this product.)
VEV Vitamin D3 K2 10,000 IU, 200 mcg MK-7, 300 Coconut Oil Softgels | NSF Certified, 2-in-1 Vitamin D3 & K2 Supplement
$15.99 (as of 24 July 2026 04:29 GMT +01:00 - More infoProduct prices and availability are accurate as of the date/time indicated and are subject to change. Any price and availability information displayed on [relevant Amazon Site(s), as applicable] at the time of purchase will apply to the purchase of this product.)